
Back to the basics #1: Getting Started with Drools 6.3.0.Final
I was creating some material for my next Workshop in South America when I thought, let's create some blog posts about the main topics, so I can share with all of you some basic tutorials that should help you to get started with the latest version of Drools. In this short post I will show how to create a very simple Drools enabled Maven project. I will also be using the CDI capabilities provided by Drools 6.3.0.Final.
Pre Requisites
In order to get started you need to have the following already installed in your environment:
- Java JDK 1.7 +
- Maven 3.2.3 +
Creating a Maven Project
(You can find the sources of this project here: https://github.com/Salaboy/drools-workshop/)
Let's start simple, let's create a Maven empty project by using the following Maven Goal:
mvn archetype:generate -DarchetypeGroupId=org.apache.maven.archetypes -DarchetypeArtifactId=maven-archetype-quickstart
This will create a new maven empty project by asking you the basic information about GroupId, ArtifactId and Version
- Define value for property 'groupId': : org.drools.workshop
- Define value for property 'artifactId': : my-first-drools-project
- Define value for property 'version': 1.0-SNAPSHOT: : <hit enter>
- Define value for property 'package': org.drools.workshop: : <hit enter>
Then you will see
- Confirm properties configuration:
- groupId: org.drools.workshop
- artifactId: my-first-drools-project
- version: 1.0-SNAPSHOT
- package: org.drools.workshop
- Y: : <hit enter>
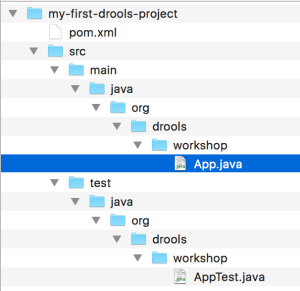
After this the project will be create and ready to be opened in your favourite IDE. The project structure will look like this:
We now need to update the pom.xml file to add the specific drools dependencies. Notice that Drools 6.3.0.Final is already in the central maven repository so no need of adding an extra repository. The pom file after editing should look like this:
<project xmlns="http://maven.apache.org/POM/4.0.0" xmlns:xsi="http://www.w3.org/2001/XMLSchema-instance" xsi:schemaLocation="http://maven.apache.org/POM/4.0.0 http://maven.apache.org/xsd/maven-4.0.0.xsd">
 <modelVersion>4.0.0</modelVersion>
<groupId>org.drools.workshop</groupId>
<artifactId>my-first-drools-project</artifactId>
<version>1.0-SNAPSHOT</version>
<packaging>jar</packaging>
<name>my-first-drools-project</name>
<url>http://salaboy.com</url>
<properties>
<project.build.sourceEncoding>UTF-8</project.build.sourceEncoding>
<kie.version>6.3.0.Final</kie.version>
<junit.version>4.11</junit.version>
<cdi.version>1.2</cdi.version>
<weld.version>2.3.0.Final</weld.version>
</properties>
<dependencies>
<dependency>
<groupId>org.kie</groupId>
<artifactId>kie-api</artifactId>
<version>${kie.version}</version>
</dependency>
<dependency>
<groupId>org.drools</groupId>
<artifactId>drools-compiler</artifactId>
<version>${kie.version}</version>
</dependency>
<dependency>
<groupId>org.drools</groupId>
<artifactId>drools-core</artifactId>
<version>${kie.version}</version>
</dependency>
<dependency>
<groupId>javax.enterprise</groupId>
<artifactId>cdi-api</artifactId>
<version>${cdi.version}</version>
</dependency>
<dependency>
<groupId>org.jboss.weld.se</groupId>
<artifactId>weld-se-core</artifactId>
<version>${weld.version}</version>
</dependency>
<dependency>
<groupId>junit</groupId>
<artifactId>junit</artifactId>
<version>${junit.version}</version>
<scope>test</scope>
</dependency>
</dependencies>
</project>
At this point I've deleted the Junit Test generated by the Archetype that was based on JUnit 3.x. Once we get our dependencies in place we can start using Drools straight away.
Bootstrapping the Rule Engine using CDI
Let's go to the App.java class that was generated automatically by the Maven Archetype. First of all we need to bootstrap CDI. CDI stands for Context and Dependency Injection and it is basically a standard set of APIs that allows us to benefit from the power of Dependency Injection inside our applications. Because CDI is only a set of APIs we need also to provide an implementation of these interfaces and that's why we specified weld-se-core as our CDI container. Weld is the CDI reference implementation, but in theory you can use any other CDI implementation.
Our App.java class should look like this now:
package org.drools.workshop;
import javax.inject.Inject;
import org.jboss.weld.environment.se.Weld;
import org.jboss.weld.environment.se.WeldContainer;
import org.kie.api.cdi.KSession;
import org.kie.api.runtime.KieSession;
/**

Hello Drools world!


*/
public class App {
@Inject
@KSession()
private KieSession kSession;
public void bootstrapDrools() {
// The KieSession was injected so we can use it now
kSession.insert("Hi There!");
int rulesFired = kSession.fireAllRules();
System.out.println("Rules Fired: "+rulesFired);
}
public static void main(String[] args) {
//Boostrap the CDI container, in this case WELD
Weld w = new Weld();
WeldContainer wc = w.initialize();
App app = wc.instance().select(App.class).get();
app.bootstrapDrools();
w.shutdown();
}
}
The main(...) method is bootstrapping Weld and then calling our App.boostrapDrools() method. Because CDI (Weld) is creating the instance of our class App it is able to Inject a new instance of our KieSession. Inside the bootstrapDrools() method we can start using it straight away. Before running this class we still need to add some important things such as our Rules!
Creating our First DRL File
In order to run this class we still need to add three more things. First and mostly important, our rules! So let's go and create a new "drl" file under the src/main/resources/ directory (yes you need to create this directory). Let's call it rules.drl:

Inside this file we can add a very simple rule:
package org.drools.workshop;
rule "My First Drools Rule"
when
$o: Object()
then
System.out.println("Rule Fired for Object: "+$o.toString());
end
Finally, we need two configuration files listed in the previous screenshot:
- beans.xml: this is required by CDI, so the container knows that this jar should be scanned so the classes inside can be Injected
<?xml version="1.0" encoding="UTF-8"?>
<beans xmlns="http://java.sun.com/xml/ns/javaee" xmlns:xsi="http://www.w3.org/2001/XMLSchema-instance" xsi:schemaLocation="http://java.sun.com/xml/ns/javaee http://java.sun.com/xml/ns/javaee/beans_1_0.xsd">
</beans>- kmodule.xml: this file is used by Drools to scan the jar for rules. Here we can configure multiple KieSession and KieBases if we need to separate our rules. For this simple example we will use all the defaults
<kmodule xmlns="http://jboss.org/kie/6.0.0/kmodule" xmlns:xsi="http://www.w3.org/2001/XMLSchema-instance">
</kmodule>
Now you have set up a new Rule Engine instance with our very simple rule and it is ready to be used.
Running our Application
As you notice we have a very simple Maven Project with a main class ready to be executed. First of all we should build and package the project. We achieve this by executing the following command:
mvn clean installYou should get a BUILD SUCCESS at the end of the execution. If not please post a comment here, I will try to help you.
Because we are using maven, we can leverage the fact that maven will load all the dependencies of our application in the class path for us and run the application by using the following command in the terminal:
mvn exec:java -Dexec.mainClass="org.drools.workshop.App"After the execution you should be able to see something like this in the output:
Oct 20, 2015 4:37:59 PM org.jboss.weld.environment.se.WeldContainer initialize
INFO: WELD-ENV-002003: Weld SE container STATIC_INSTANCE initialized
<strong>Rule Fired for Object: Hi There!</strong>
<strong>Rules Fired: 1</strong>
Oct 20, 2015 4:38:00 PM org.jboss.weld.environment.se.WeldContainer shutdown
Our Rule Fired!
Summary
We have seen how to create a Drools project from the scratch using Maven. We also look at how to use CDI (and Weld) to create our KieSession (Rule Engine instances) for us. I strongly recommend you opening the project in your favourite IDE and start playing around with Drools.
In my next post I will show you how to add a JUnit test to our project, so you can write more serious rules! And we will continue adding more complex rules to it.
If you have any questions or doubts get in touch!