
Kubernetes’ Built-In Mechanisms for Releasing New Versions

Take 35% off Continuous Delivery for Kubernetes by entering fccsalatino into the discount code box at checkout at manning.com.
Kubernetes comes with built-in mechanisms ready to deploy and upgrade your services. Both Deployment and StatefulSets resources orchestrate ReplicaSets to run a built-in rolling update mechanism when the resource’s configurations change. Both Deployments and StatefulSets keep track of the changes between one version and the next, allowing rollbacks to previously recorded versions.
Both Deployments and StatefulSets are like cookie cutters; they contain the definition of how the container(s) for our service(s) needs to be configured and, based on the replicas specified, will create that amount of containers. To route traffic to these containers, we will need to create a Service.
Using a Service for each Deployment is standard practice, and it is enough to enable different services to talk to each other by using a well-known Service name. But if we want to allow external users (from outside our Kubernetes Cluster) to interact with our Services, we will need an Ingress resource (plus an ingress controller). The Ingress resource will be in charge of configuring the networking infrastructure to enable external traffic into our Kubernetes cluster; this is usually done for a handful of services. In general, not every service is exposed to external users.
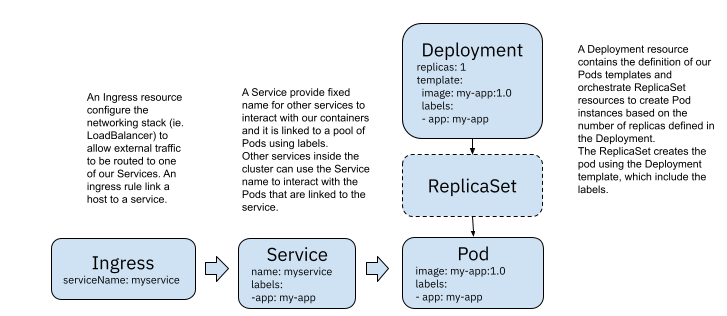
Figure 1 Kubernetes built-in resources for routing traffic
Now, imagine what happens when you want to update the version of one of these external-facing services. We can agree that it is pretty common that these services are user interfaces. And we can also agree that it will be pretty good if we can upgrade the service without having downtime. The good news is that Kubernetes was designed with zero-downtime upgrades in mind and for that reason, both Deployments and StatefulSets come equipped with a rolling update mechanism.
If you have multiple replicas of your application Pods, the Kubernetes Service resource acts as a load balancer. This allows other services inside your cluster to use the Service name without caring about which replica they are interacting with (or which IP address each replica has).
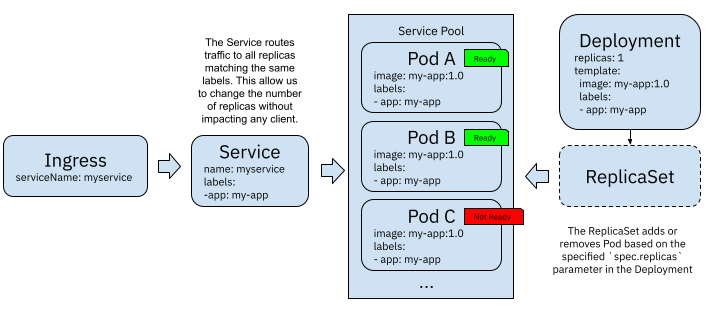
Figure 2 Kubernetes Service acting as a load balancer
To attach each of these replicas to the load balancer (Kubernetes Service) pool, Kubernetes uses a probe called “Readiness Probe” (https://kubernetes.io/docs/tasks/configure-pod-container/configure-liveness-readiness-startup-probes/) to make sure that the container running inside the Pod is ready to accept incoming requests, in other words, it has finished bootstrappinsg. In figure 2, Pod C is not ready yet, hence it is not attached to the Service pool, and no request has been forwarded to this instance yet.
Now, if we want to upgrade to using the `my-app:1.1` container image, we need to perform some very detailed orchestration of these containers. Suppose we want to make sure that we don’t lose any incoming traffic while doing the update. We need to start a new replica using the `my-app:1.1` image and make sure that this new instance is up and running and ready to receive traffic before we remove the old version. If we have multiple replicas, we probably don’t want to start all the new replicas simultaneously, as this will cause doubling up all the resources required to run this service.
We also don’t want to stop the old `my-app:1.0`replicas in one go. We need to guarantee that the new version is working and handling the load correctly before we shut down the previous version that was working fine. Luckily for us, Kubernetes automates all the starting and stopping of containers using a rolling update strategy (https://kubernetes.io/docs/tutorials/kubernetes-basics/update/update-intro/).
Rolling updates
Deployments and StatefulSets come with these mechanisms built-in, and we need to understand how these mechanisms work to know when to rely on them and their limitations and challenges.
A rolling update consists of well-defined checks and actions to upgrade any number of replicas managed by a Deployment. Deployment resources orchestrate ReplicaSets to achieve rolling updates, and the following figure shows how this mechanism works:
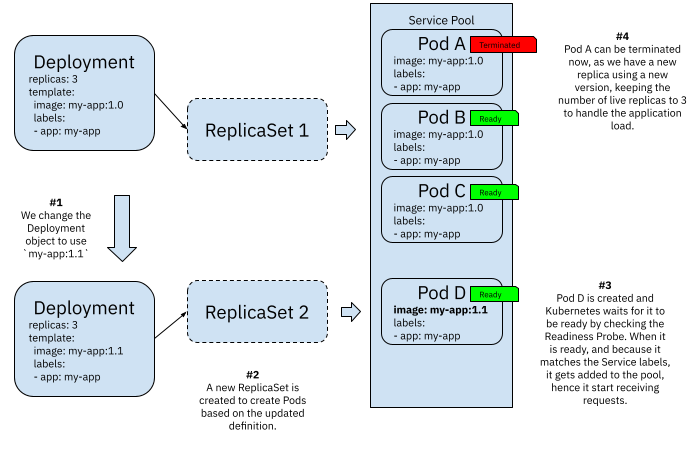
Figure 3 Kubernetes Deployments rolling updates
Whenever you update a Deployment resource, the rolling update mechanism kicks off by default. A new ReplicaSet is created to handle the creation of Pods using the newly updated configuration defined in `spec.template`. This new ReplicaSet will not start all three replicas straight away, as this will cause a surge in resource consumption. Hence it will create a single replica, validate that it is ready, attach it to the service pool and then terminate a replica with the old configuration.
By doing this, the Deployment object guarantees three replicas active at all times handling clients’ requests. Once Pod D is up and running, and Pod A is terminated, ReplicaSet 2 can create Pod E, wait for it to be ready and then terminate Pod B. This process repeats until all Pods in ReplicaSet 1 are drained and replaced with new versions managed by ReplicaSet 2. If you change the Deployment resource again, a new ReplicaSet (ReplicaSet 3) will be created, and the process will repeat in the same way.
An extra benefit of using rolling updates is that ReplicaSets contain all the information needed to create Pods for a specific Deployment configuration. If something goes wrong with the new container image (in this example `my-app:1.1`) we can easily revert (rollback) to a previous version. You can configure Kubernetes to keep a certain number of revisions (changes in the Deployment configuration), so changes can be rolled back or rolled forward.
Changing a Deployment object will trigger the rolling update mechanism, and you can check some of the parameters that you can configure to the default behaviour here (https://kubernetes.io/docs/concepts/workloads/controllers/deployment/). StatefulSets have a different behavior as the responsibility for each replica is related to the state that is handled. The default rolling update mechanism works a bit differently. You can find the differences and a detailed explanation about how this work here (https://kubernetes.io/docs/concepts/workloads/controllers/statefulset/).
Check out the following commands to review the Deployment revisions history and doing rollbacks to previous versions (https://kubernetes.io/docs/concepts/workloads/controllers/deployment/#checking-rollout-history-of-a-deployment):
kubectl rollout history deployment/frontend
kubectl rollout undo deployment/frontend --to-revision=2
If you haven’t played around with rolling updates with Kubernetes I strongly recommend you create a simple example and try these mechanisms out. There are loads of examples online and interactive tutorials where you can see this in action.
Canary Releases
Rolling updates kick in automatically, and they are performed as soon as possible if we are using Deployments; what happens when we want to have more control over when and how we roll out new versions of our services?
Canary Releases (https://martinfowler.com/bliki/CanaryRelease.html) is a technique used to test if a new version is behaving as expected before pushing it live in front of all our live traffic.
While rolling updates will check that the new replicas of the service are ready to receive traffic, Kubernetes will not check that the new version is not failing to do what it is supposed to do. Kubernetes will not check that the latest versions perform the same or better than the previous. Hence we can be introducing issues to our applications. More control on how these updates are doing is needed.
If we start with a Deployment configured to use a Docker image called `my-app:1.0`, have two replicas, and we label it with `app: myapp` a Service will route traffic as soon as we use the selector `app:myapp`. Kubernetes will be in charge of matching the Service selectors to our Pods. In this scenario, 100% of the traffic will be routed to both replicas using the same Docker image (`my-app:1.0`).

Figure 4 Kubernetes Service routes traffic to two replicas by matching labels
Now imagine changing the configuration or having a new Docker image version (maybe `my-app:1.1`). We don’t want to automatically migrate our Deployment V1 to the new version of our Docker image. Alternatively, we can create a second Deployment (V2) resource and leverage the service `selector` to route traffic to the new version.
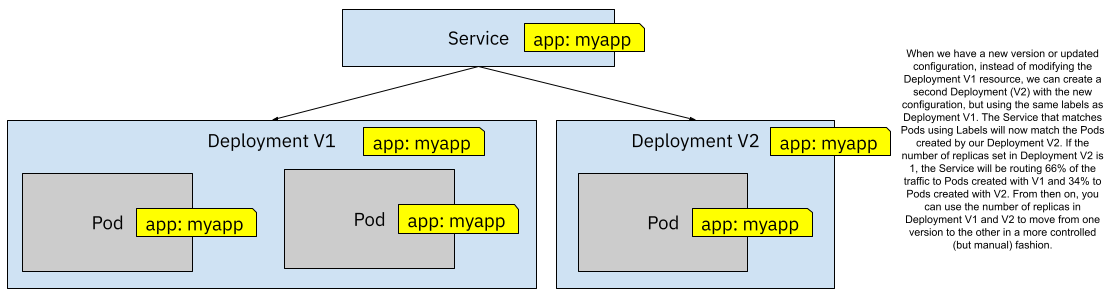
Figure 5 One Service and two Deployments sharing the same labels
By creating a second Deployment (using the same labels), we are routing traffic to both versions simultaneously, and how much traffic goes to each version is defined by the number of replicas configured for each Deployment. By starting more replicas on Deployment V1 than Deployment V2 you can control what percentage of the traffic will be routed to each version. Figure 5.5 shows a 66%/34% (2 to 1 pods) traffic split between V1 and V2. Then you can decrease the number of replicas for Deployment V1 and increase the replicas for V2 to slowly move towards V2. Notice that you don’t have a fine grain control about which requests go to which version—the Service forward traffic in a round-robin fashion to all the matched pods.
Because we have replicas ready to receive traffic at all times, there shouldn’t be any downtime of our services when we do Canary Releases.
A significant point to make about rolling updates and Canary Releases is that they depend on our services supporting traffic to be forwarded to different versions simultaneously without breaking. This usually means that we cannot have breaking changes from version 1.0 to version 1.1 that will cause the application (or the service consumers) to crash when switching from one version to the other. Teams making the changes need to be aware of this restriction when using rolling updates and Canary Releases, as traffic will be forwarded to both versions simultaneously. For cases when two different versions cannot be used simultaneously, and we need to have a hard switch between version 1.0 and version 1.1 we can look at Blue/Green Deployments.
Blue/Green Deployments
Whenever you face a situation where you can just not upgrade from one version to the next and have users/clients consuming both versions simultaneously, you need a different approach. Canary Deployments or Rolling Updates, as explained in the previous section, will just not work. If you have breaking changes, you might want to try Blue/Green deployments (https://martinfowler.com/bliki/BlueGreenDeployment.html).
Blue/Green deployments help us move from version 1.0 to version 1.1 at a fixed point in time, changing how the traffic is routed to the new version without allowing the two versions to receive requests simultaneously and without downtime.
Blue/Green Deployments can be implemented using built-in Kubernetes Resources by creating two different Deployments, as shown in figure 6.
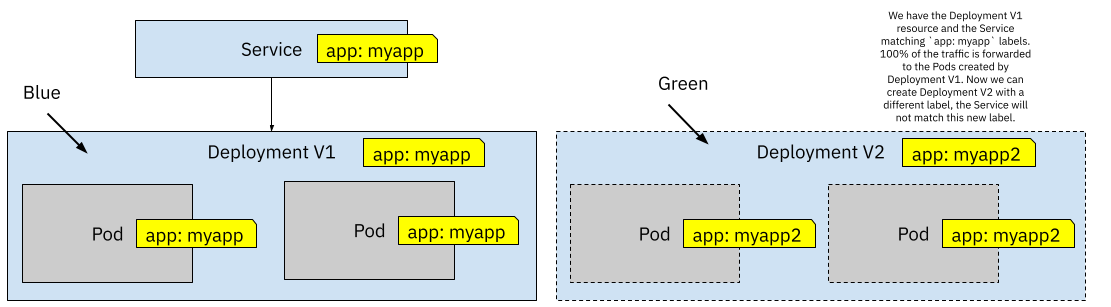
Figure 6 Two Deployments using different Labels
In the same way, as we did with Canary Releases, we start with a Service and a Deployment. The first version of these resources is what we call “Blue”. For Blue/Green Deployments, we can create a separate Deployment (V2) resource to start and get ready for the new version of our service when we have a new version. This new Deployment needs to have different labels for the Pods that it will create, so the Service doesn’t match these Pods just yet. We can connect to Deployment V2 pods by using `kubectl port-forward` or running other in-cluster tests until we are satisfied that this new version is working. When we are happy with our testing, we can switch from Blue to Green by updating the `selector` labels defined in the Service resource.
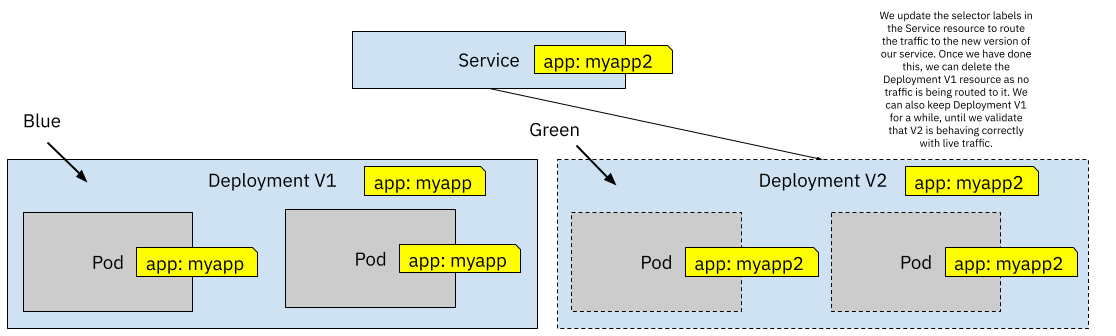
Figure 7 When the new version is ready we switch the label from the Service selector to match version V2 labels
Blue/Green Deployments make a lot of sense when we cannot send traffic to both versions simultaneously, but it has the drawback of requiring both versions to be up at the same time to switch traffic from one to the other. When we do Blue/Green deployments it is recommended to have the same amount of replicas running for the new version. We need to make sure that when traffic is redirected to the new version, this version is ready to handle the same load as the old version.
The moment we switch the label selector in the Service resource, 100% of the traffic is routed to the new version, Deployment V1 pods’ stop receiving traffic. This is quite an important detail as if some state was being kept in V1 Pods you will need to drain state from the Pods, migrate and make this state available for V2 Pods. In other words, if your application is holding state in-memory, you should write that state to a persistent storage so V2 Pods can access it and resume whatever work was being done with that data. Remember that most of these mechanisms were designed for stateless workloads, so you need to make sure that you follow these principles to make sure that things work as smoothly as possible.
For Blue/Green deployments, we are interested in moving from one version to the next at a given point in time, but what about scenarios when we want to actively test two or more versions with our users at the same time, to then decide which one performs better. Let’s take a look at A/B testing next.
A/B testing
It is a quite common requirement to have two versions of your services running at the same time and we want to test these two versions to see which one performs better. (https://blog.christianposta.com/deploy/blue-green-deployments-a-b-testing-and-canary-releases/ ). Sometimes you want to try a new user interface theme, place some UI elements in different positions or new features added to your app and gather feedback from users to decide which one works best.
To implement this kind of scenario in Kubernetes, you need to have two different Services pointing to two different Deployments. Each Deployment handles just one version of the application/service. If you want to expose these two different versions outside the cluster you can define an Ingress resource with two rules. Each rule will be in charge of defining the external path or subdomain to access each service.
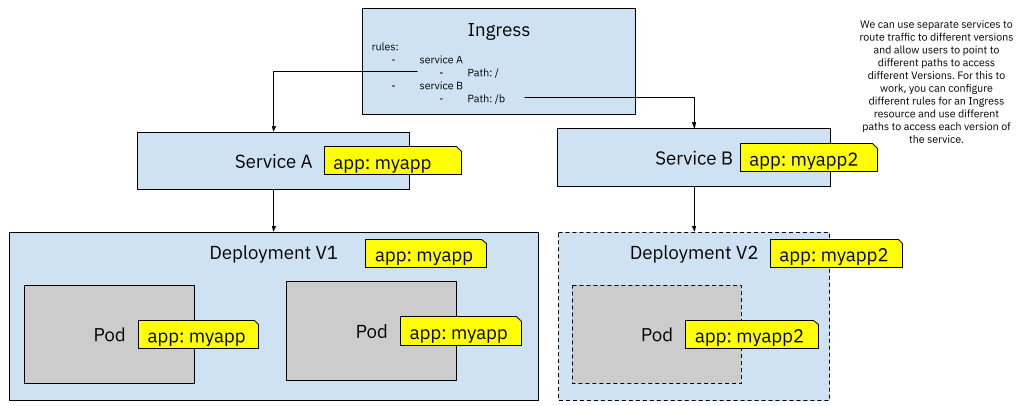
Figure 8 Using two Ingress rules for pointing to A and B versions
If you have your application hosted under the www.example.com domain, the Ingress resource defined in figure 8 will direct traffic to Service A, allowing users to point their browsers to www.example.com/b to access Service B. Alternatively, and depending on how you have configured your Ingress Controller, you can also use subdomains instead of path-based routing meaning that to access the default version you can keep using www.example.com but to access Service B you can use a subdomain such as test.example.com
I can hear you saying, what a pain, look at all the Kubernetes resources that I need to define and maintain to just achieve something that feels basic and needed for everyday operations. Let’s quickly summarize the limitations and challenges that we found so far, so we can take a look at Knative Serving and how can it help us to implement these strategies in a more streamlined way.
Limitations and complexities of using Kubernetes’ built-in building blocks
Canary Releases, Blue/Green deployments and A/B testing can be implemented using built-in Kubernetes resources. But as you have seen in the previous sections, creating different deployments, changing labels and calculating the number of replicas needed to achieve percentage-based distribution of the requests is quite a major task and very error-prone. Even if you use a GitOps approach with Jenkins X or with other tools, creating the required resources with the right configurations is quite hard and it takes a lot of effort.
We can summarize the drawbacks of implementing these patterns using Kubernetes building blocks as follows:
- Manual creation of more Kubernetes resources, such as Deployments, Services and Ingress Rules to implement these different strategies can be error-prone and cumbersome. The team in charge of implementing the release strategies need to understand deeply how Kubernetes behaves to achieve the desired configuration.
- No automated mechanisms are provided out-of-the-box to coordinate and implement the resources required by each release strategy.
- Error-prone, as multiple changes need to be applied at the same time in different resources for everything to work as expected
- If we notice a demand increase or decrease in our services, we need to manually change the number of replicas for our Deployments or install and configure a custom autoscaler. Unfortunately, if you set the number of replicas to 0, there will not be any instance to answer requests, requiring you to have at least one replica running all the time.
Out of the box, Kubernetes doesn’t include any mechanism to automate or facilitate these release strategies, and that becomes a problem quite quickly if you are dealing with a large number of services that depend on each other.
One thing is clear, your teams need to be aware of the implicit contracts imposed by Kubernetes regarding 12-factor apps and how their services APIs evolve to avoid downtime. Your developers need to know how Kubernetes' built-in mechanisms work in order to have more control over how your applications are upgraded.
If we want to reduce the risk of releasing new versions, we want to empower our developers to have these release strategies available for their daily experimentation.