Orchestrating Cloud Events with Zeebe
Disclaimer: This blog post is about Cloud-Native software, containers, Cloud Events, and Workflows. It describes a concrete example that you can run yourself using Kubernetes, Helm, and Zeebe.io. You should be familiar with Kubernetes and Helm to follow along and will learn about zeebe.io and cloudevents.io on your way.
While working with Kubernetes the chances are quite high that you’ll find services written in different languages and using different technologies stacks. CloudEvents (cloudevents.io / CNCF spec) was born to enable these systems to exchange information by describing their events in a standard way, no matter which transports these services are using (HTTP, Messaging AMPQ/JMS, Protobuf, etc).
In such scenarios, where you have events being produced and consumed by different systems, there are common requirements that start to arise when the system grows larger, such as:
- Visibility: being able to see and understand event interactions from a business perspective.
- Coordination: sometimes you just need to define and check that a certain sequence of events happened or are produced to meet certain goals.
- Error Handling: mechanisms to deal with problems if things are not going as expected, to make sure that we correct these situations and, from a business perspective, we keep track and continuously improve how we operate.
- Compliance: enforcing certain rules and orders between these events to make sure that regulations are being met.
To tackle such requirements without reinventing the wheel you can use a Workflow Engine which provides very flexible solutions for these common sets of requirements. In this blog post, I cover Zeebe, a Cloud Native Workflow Engine, and how you can consume and emit Cloud Events from a Workflow.
Example
Let’s imagine that we have two services to deal with customers wanting to buy tickets for music concerts on our website. Most of these systems are required to handle high loads when a new concert goes online, as fans might want to buy all the tickets in a short period of time.
The website and customer flow look like this:
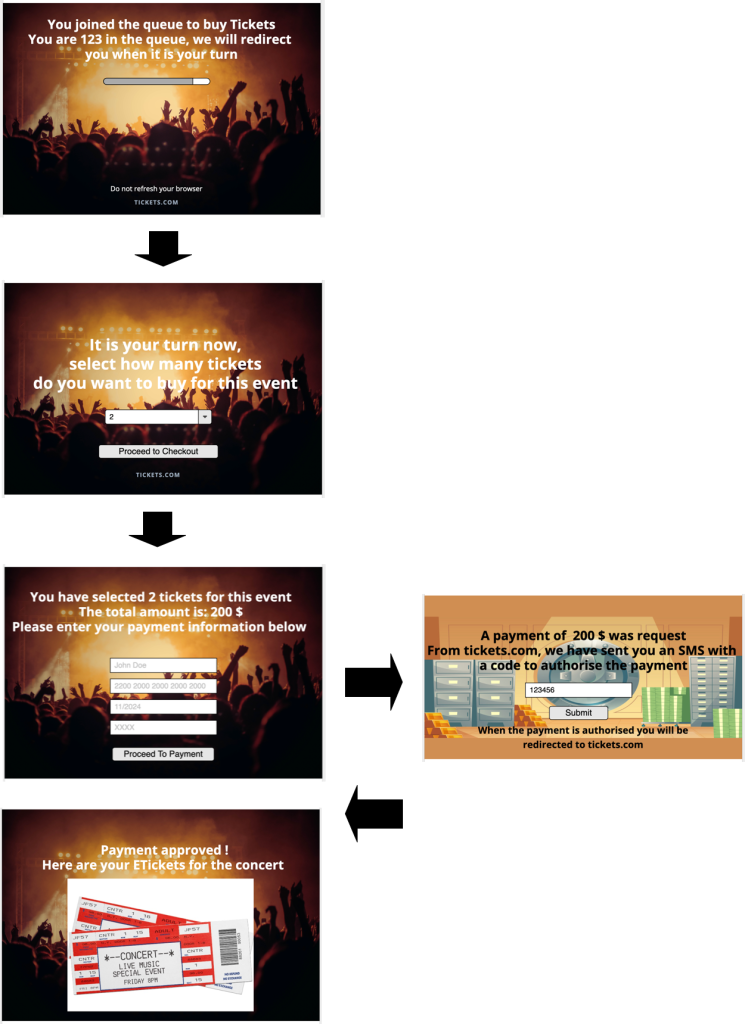
In the backend, there will be a service in charge of queuing customers that want to buy tickets and a payment service in charge of processing the payments. Due to the high demand, timeouts need to be in place to make sure that customers that are not willing to buy the tickets get removed from the queue if they spend too much time deciding.
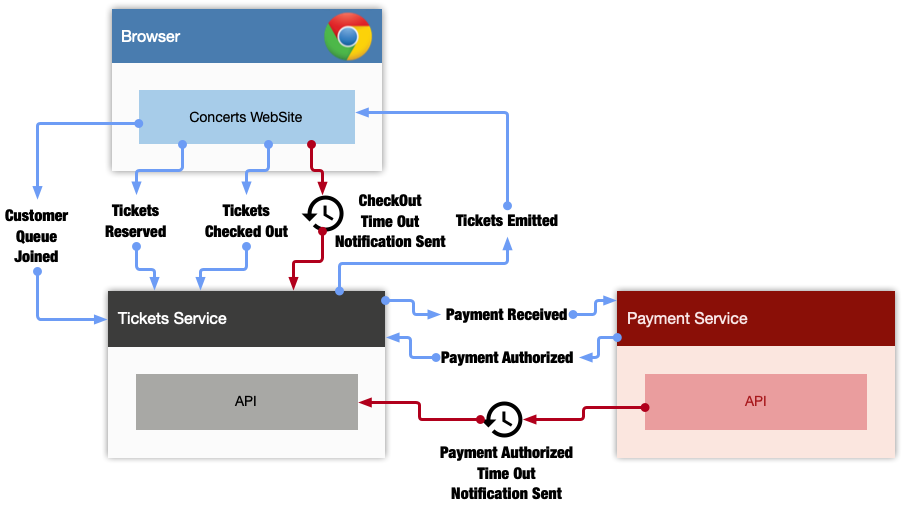
These two services have been designed with an Event-Driven Architecture in mind, so they emit events and react to events. The following events are consumed and emitted by the TicketsService:
- Tickets.CustomerQueueJoined: A customer is interested in buying a ticket so they have joined the queue to buy tickets
- Tickets.Requested: A customer has selected one or more tickets for the concert and is ready to checkout.
- Tickets.CheckedOut: A checkout action was confirmed by the customer.
- Tickets.Emitted: the tickets have been emitted to the customer.
- Notifications.Requested: A notification was sent to the customer. In our example, this can happen due to time outs while checking out the tickets or due time out from the payment service while authorizing the payment.
On the other hand, the PaymentService can react and emit the following events:
- Payments.RequestReceived: A payment request has been received and it is queued to be processed.
- Payments.Authorized: The payment was successfully processed and authorized.
By looking at these events you can quickly realize that the interactions between these services and the Customer on the website are asynchronous. Events are emitted and some other service will react and process them, probably emitting another event as a result.
In the following sections, an Orchestration approach is introduced without changing our service, and we can tackle the points mentioned in the introduction (Visibility, Coordination, Error Handling, Compliance).
The Orchestration Approach
Workflow Engines were designed to orchestrate services and people together providing visibility and audit logs for how the work is being done. These engines work by automating (running) models that represent these service-to-service and service-to-people interactions. These models provide a graphical representation that can be understood not only by technical people but by every person inside the company. Workflow Engines help us to make sure that the services being orchestrated don't need to know about each other, which makes our services decoupled and independent.
If we add CloudEvents to the picture, the workflow engine will emit and consume cloud events itself and can then enforce certain rules about their sequence. A workflow engine will also provide out-of-the-box visibility to all these interactions and automatic data aggregation to understand how our systems are working together from a business perspective.
A well understood and industry-wide used modeling language is BPMN by the OMG. A workflow model in BPMN will look like this:
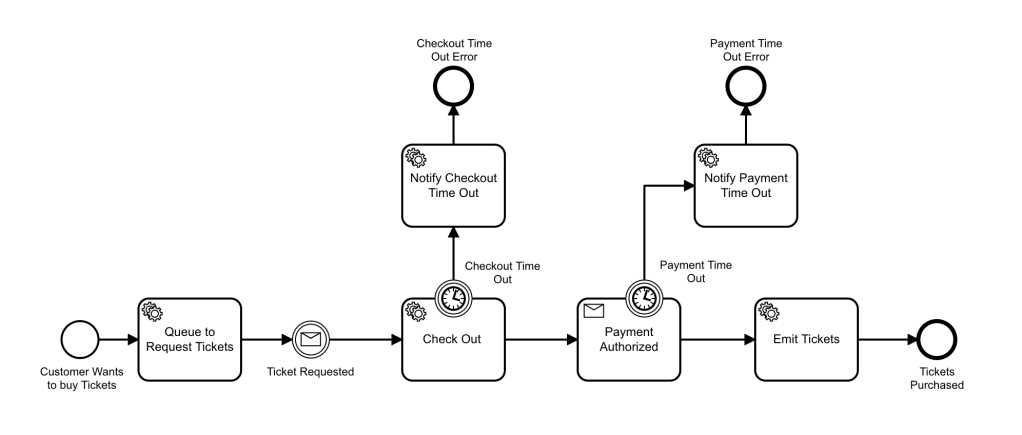
This diagram is not imposing any runtime constraints about where the Services should be or how to interact with them, it is only defining what the sequence of these events should be and, for example, when to emit certain events. Both the Tickets Service and the Payments Service can be running in the Cloud, On-Prem, with or without containers. Zeebe can orchestrate these events to make sure that ticket purchase events are tracked correctly.
It is important to recognize the flexibility and features provided by BPMN in this very simple example. Out-of-the-box with BPMN we can use Timer Boundary events to define time outs for receiving Cloud Events as well as do Error Handling in case things go wrong. BPMN can do much more than what is shown in this example, for example, split the flow based on conditions, do tasks in parallel, more complex error handling, etc. You can find more about BPMN here.
You can find the BPMN models used in this blog post and some other examples here: https://github.com/salaboy/zeebe-cloud-events-examples
Architecture
By using a Cloud-Native Workflow Engine like Zeebe, we can define this flow of events with a simple BPMN Diagram that allows us to express quite complicated scenarios in a graphical way.
Zeebe, the workflow orchestrator, is pretty flexible in supporting different deployment scenarios. It can be installed into your local environment using Docker Compose, run on Kubernetes using Helm, or you can leverage Camunda Cloud which gives you an installation-free and managed Zeebe Cluster instance.
To enable Zeebe to consume and emit Cloud Events, you will need the Zeebe Cloud Events Router, which can map BPMN Events and Commands to Cloud Events which are understood by the existing services. This is a bidirectional router, as it is in charge of translating events that are generated outside the orchestrator scope (outside Zeebe) and emitting events that are meant for Domain-Specific Services.
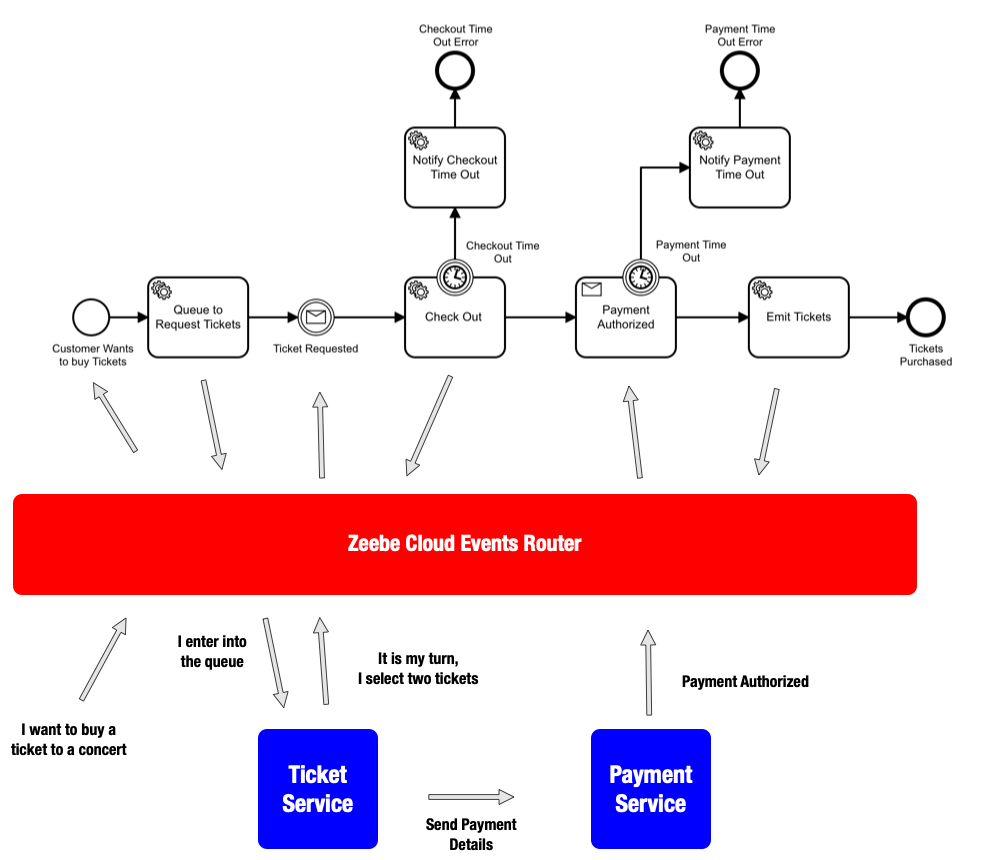
Cloud Events could be transported via various protocols, e.g. Kafka, WebSockets or HTTP. This blog post focuses on HTTP, in future posts you will see how these HTTP Cloud Event endpoints can be integrated with services that use other transports.
The Zeebe Cloud Events Router exposes a set of HTTP endpoints to receive external Cloud Events:
- / POST -> receive a Cloud Event that will be mapped to a Job Completion, which will make the task to move forward.
- /jobs GET -> Get a list of Pending Jobs to be completed
- /message POST -> Receive a Cloud Event that will be mapped to a BPMN Message
- /workflow POST -> Receive a Cloud Event that will be mapped to Start a Workflow Instance
- /workflows POST -> Create a mapping between a Cloud Event Type and a Workflow Key, so we can start a new Workflow Instance with a Cloud Event
- /workflows GET -> Get all available Cloud Events to Workflow Mappings
You can always access the Open API UI in the Router by pointing your browser to http://<IP ADDRESS>:<PORT>/swagger-ui.html for a more interactive list of the REST endpoints provided by the Zeebe Cloud Events Router.
Cloud Events Mappings
There are three patterns supported in BPMN workflows::
1# EMIT_ONLY, meaning that you want to emit a Cloud Event and move forward. We can always catch/consume another event later in the workflow, for example:
1-A) Emit and catch Cloud Event with a BPMN Intermediate Catch Event
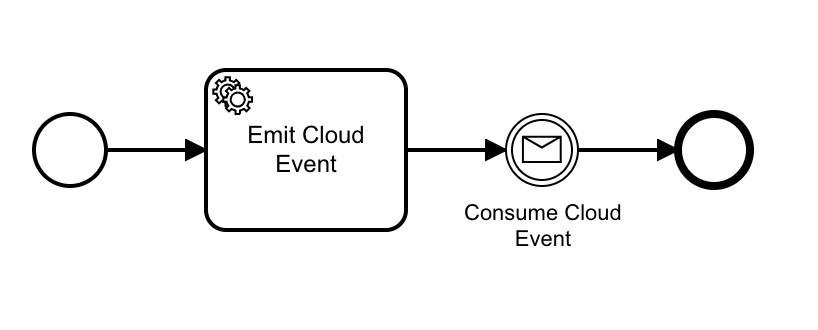
1-B) Emit and catch Cloud Event with a BPMN Receive Task. As we will see in the following example, using a Receive Task enables use to use Boundary Events.

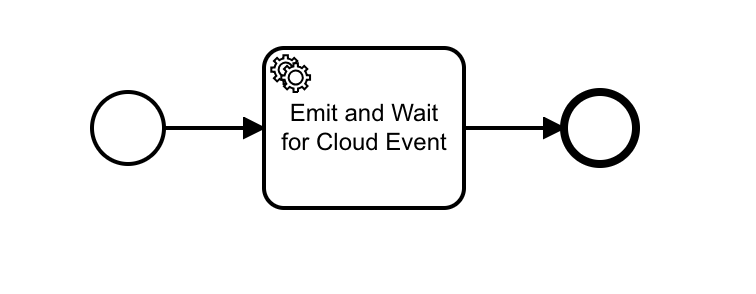
#2 WAIT_FOR_CLOUD_EVENT emit and wait for a Cloud Event to continue inside a BPMN Service Task
#3 Start a Workflow Instance by sending a Cloud Event
The first approach (EMIT_ONLY) can be used when you want to use a BPMN Service Task to Emit a Cloud Event, usually to delegate the logic to a third party service and it doesn’t need to wait for an incoming event to complete. An incoming event can be mapped by using a BPMN Intermediate Catch Event or a BPMN Receive Task.
The second approach (WAIT_FOR_CLOUD_EVENT) allows you to map two Cloud Events to the same BPMN Service Task. The first Cloud Event will be the one that is emitted and the second one will define when to complete the Service Task. This is usually to map a service that reacts to an event and, when finished processing, emits one.
A third (Start Workflow Instance) pattern can be considered the mapping between a Cloud Event and the action of starting a Workflow Instance. For this pattern, you will need to map which Cloud Event can trigger the creation of new Workflow Instances.
The following example uses these three patterns to illustrate how to emit and consume Cloud Events from a BPMN Workflow. You can find the BPMN model here.
For example, if we want to emit a Cloud Event, the Queue To Request Tickets Service Task defines the following properties and headers:
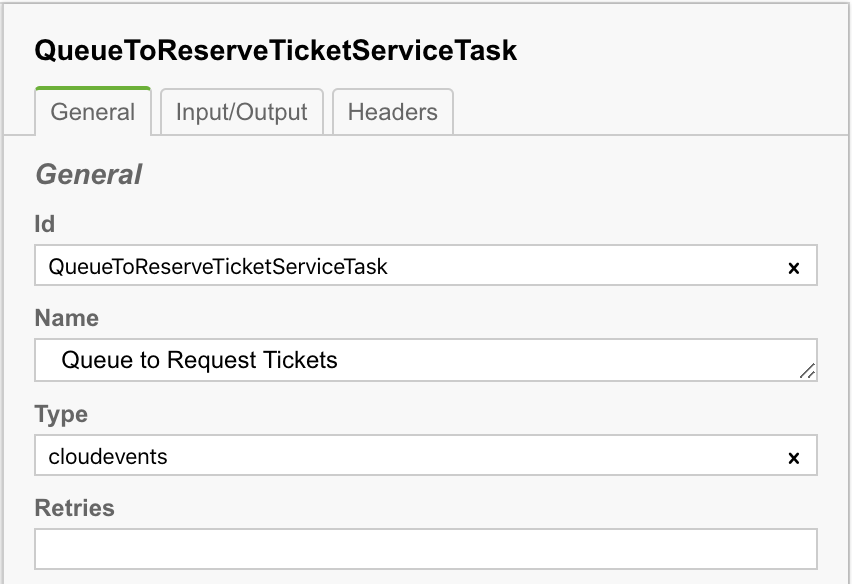
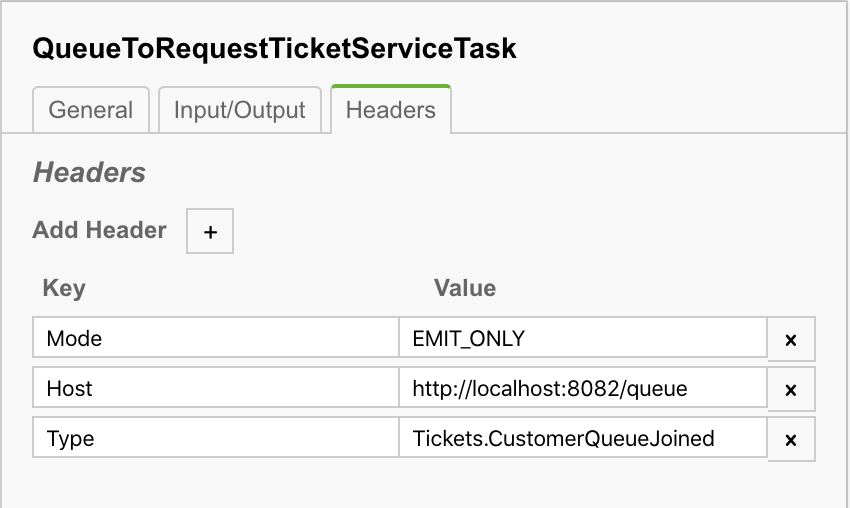
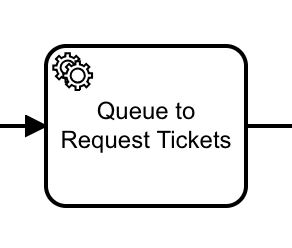
As you can see there is one important property and 3 headers being defined:
- ServiceTask.Type = “cloudevents”, this delegates the work to our Zeebe Cloud Events Router.
- Header Mode = EMIT_ONLY defines the behavior, for this mode, a Cloud Event will be emitted
- Header Type = “Tickets.CustomerQueueJoined” defines the type of Cloud Event that will be emitted
- Header Host = “<IP_ADDRESS>” this is where the Cloud Event will be emitted to.
It is important to note that the data of the Cloud Event created will contain all the workflow variables with their current value.
The example also shows how to emit and consume different Cloud Events from the same Service Task:
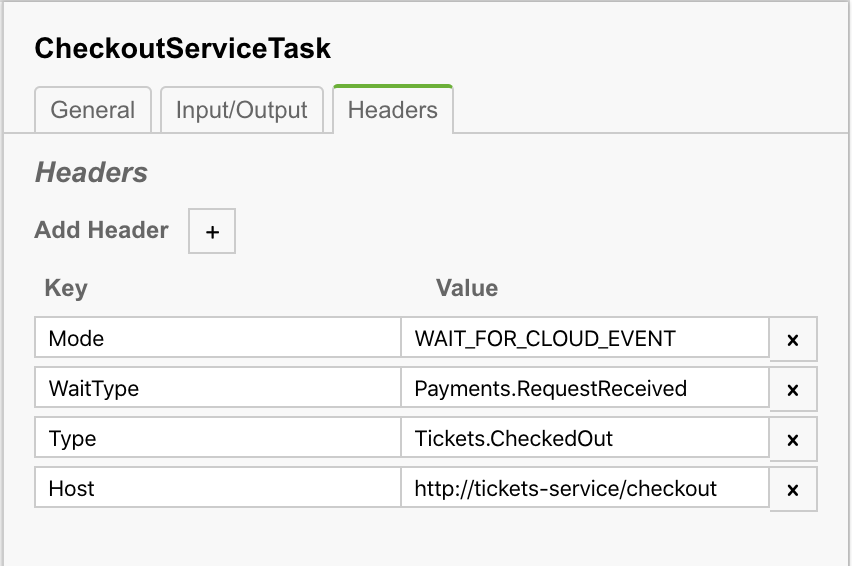
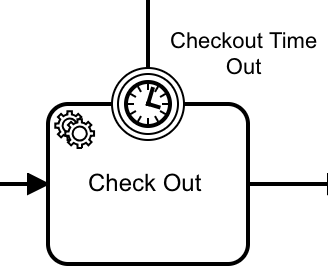
For this mode, the Service Task will wait for a Cloud Event of type “Payments.RequestReceived” to complete.
Running the Example
There is a Java Spring Boot implementation of this example available here: https://github.com/salaboy/zeebe-cloud-events-examples. There are several ways of running this example (starting all the services locally in your laptop, docker, dockercompose, Kubernetes). We will take a look at two of these options:
- Running in your own Kubernetes Cluster with Helm
- Running with Camunda Cloud
In order to run the example you will need the following components:
- Zeebe
- Zeebe Cloud Events Router
- Tickets Service
- Payment Service
The example, for the sake of simplicity, uses only HTTP transport, but it can be easily expanded to use other transports such as WebSockets and Kafka.
Running in your own Kubernetes Cluster with Helm
Because we are building Cloud-Native Applications, we will install these services in a Kubernetes Cluster.
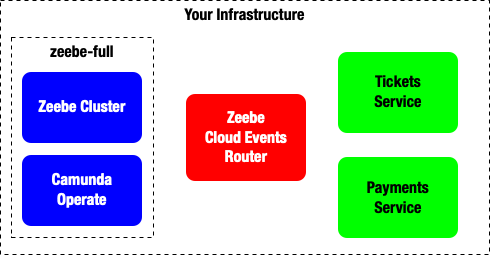
We can leverage Helm to install a Zeebe Cluster including Operate into your Kubernetes cluster:
helm repo add zeebe http://helm.zeebe.io
helm install my-zeebe zeebe/zeebe-full
Then we can install the Zeebe Cloud Events Router:
helm install router --set env.ZEEBE_CLIENT_BROKER_CONTACTPOINT=my-zeebe-zeebe-gateway:26500 zeebe/zeebe-cloud-events-router
Notice that we are pointing the Zeebe Cloud Events Router to our Zeebe Cluster Gateway address.
And finally, we install the Tickets and Payment Services:
helm install --set env.ZEEBE_CLOUD_EVENTS_ROUTER=http://zeebe-cloud-events-router
tickets zeebe/tickets-service
helm install --set env.ZEEBE_CLOUD_EVENTS_ROUTER=http://zeebe-cloud-events-router payments zeebe/payments-service
Notice how both services are referencing the Zeebe Cloud Events router to be able to interact with it.
In order to interact with Operate, the Zeebe Cluster and the Cloud Events Router inside your cluster you can use `kubectl port-foward`:
kubectl port-forward svc/my-zeebe-zeebe-gateway 26500:26500
Now you can run for example `zbctl status --insecure` from your terminal to check the Zeebe Cluster Topology and Status.
kubectl port-forward svc/zeebe-cloud-events-router 8085:80
Now you can interact with the Zeebe Cloud Events Router in your localhost:8085 address. Later you will send HTTP requests to some of these endpoints using curl from your terminal.
kubectl port-forward svc/my-zeebe-operate 8081:80
Now you can point your browser to http://localhost:8081 and use Operate to see which workflows are available and how many executions do you have in your environment. User: demo, Password: demo.

Now we can deploy the Tickets Workflow, which can be found in this repository: https://github.com/salaboy/zeebe-cloud-events-examples
zbctl deploy tickets.bpmn --insecure
{
  "key": 2251799813685505,
  "workflows": [
    {
      "bpmnProcessId": "TICKETS",
      "version": 1,
      "workflowKey": 2251799813685504,
      "resourceName": "tickets.bpmn"
    }
  ]
}
In order to register a Cloud Event to start a new workflow instance, you need to register this mapping into the Zeebe Cloud Events Router, which associates a Cloud Event to a Workflow Key:
> curl -X POST http://localhost:8085/workflows -H "Content-Type: application/json" -d '{"cloudEventType" : "Tickets.Purchase", "bpmnProcessId" : "TICKETS"}'
Now you can start a workflow by emitting a Cloud Event “Tickets.Purchase” to start a workflow:
> curl -X POST http://localhost:8085/workflow -H "Content-Type: application/json" -H "Ce-Id: ABC-123" -H "Ce-Type: Tickets.Purchase" -H "Ce-Source: curl" -d '{"sessionId":"1" }'
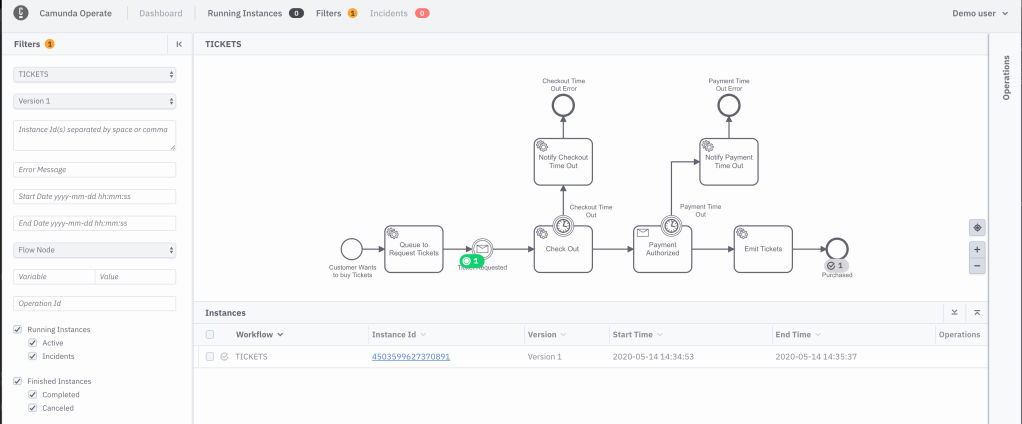
In Operate you will see the token moving forward until the workflow complete.
Running the example with Camunda Cloud
Now if you want to make your life easier, you can run Zeebe in Camunda Cloud, which is a managed service for Zeebe offered by Camunda. In this case, you only need to operate your services, and the Zeebe Cloud Events Router yourself.
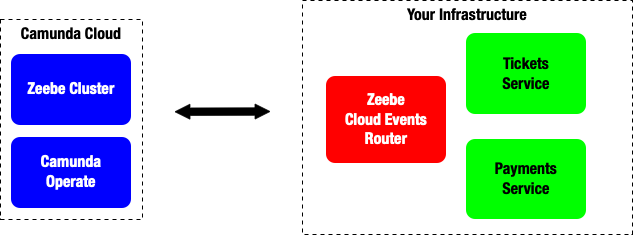
After signing up for an account in Camunda Cloud(Beta) you can create a Zeebe cluster in self-service. I’ve created one called CloudEvents:
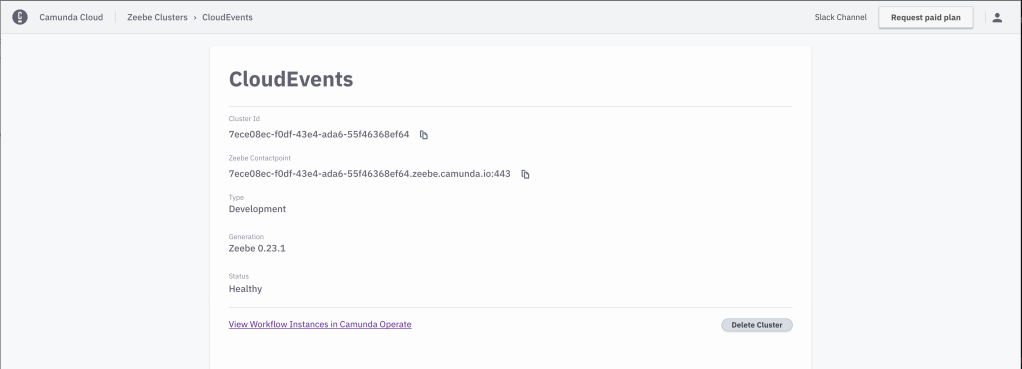
Getting my cluster up and running took me less than 5 minutes. And as you can see you also have Camunda Operate installed.
You can now interact with this new Development Cluster by using `zbctl` as we did in the previous section, but instead of using `kubectl port-forward` you can now export your credentials as environment variables to allow `zbctl` to connect with the remote cluster. If you scroll down in your Camunda Cloud Console, you will see the export commands that you can copy and paste into your terminal. Once this is done, you can deploy your workflow definition to the remote cluster using the same command as we did before:
Note: Remember that you can find the BPMN models in this repository: https://github.com/salaboy/zeebe-cloud-events-examples
> zbctl deploy tickets.bpmn
Notice that now we are using SSL so there is no need for the `--insecure` flag.
For running the Zeebe Cloud Events Router against a Zeebe Cluster in Camunda Cloud you just need to make sure that the Zeebe Cloud Events Router can connect to the Zeebe Cluster, and you do that by sending the following variables when you install the Zeebe Cloud Events Router with Helm:
> helm install router --set env.ZEEBE_CLIENT_BROKER_CONTACTPOINT=7ece08ec-f0df-43e4-ada6-55f46368ef64.zeebe.camunda.io:443 --set env.ZEEBE_CLIENT_ID=KChsFczamyQ604uGlCHployFmcavMo3n --set env.ZEEBE_CLIENT_SECRET=<YOUR SECRET> --set env.ZEEBE_AUTHORIZATION_SERVER_URL=https://login.cloud.camunda.io/oauth/token --set env.ZEEBE_CLIENT_SECURITY_PLAINTEXT=false zeebe/zeebe-cloud-events-router
Notice that you can obtain <YOUR SECRET> from the Camunda Cloud Console, as you did for the terminal, this secret is needed to establish the connection over SSL.
Once the Zeebe Cloud Events Router is running you can start new Workflow Instances in the same way as we did before.
Register a Cloud Event to Start new Workflow Instances, you do this mapping into the Zeebe Cloud Events Router by associating a Cloud Event to a Workflow Key:
> curl -X POST http://localhost:8085/workflows -H "Content-Type: application/json" -d '{"cloudEventType" : "Tickets.Purchase", "bpmnProcessId" : "TICKETS"}'
Now you can start a workflow by emitting a Cloud Event “Tickets.Purchase” to start a workflow:
> curl -X POST http://localhost:8085/workflow -H "Content-Type: application/json" -H "Ce-Id: ABC-123" -H "Ce-Type: Tickets.Purchase" -H "Ce-Source: curl" -d '{"sessionId":"1" }
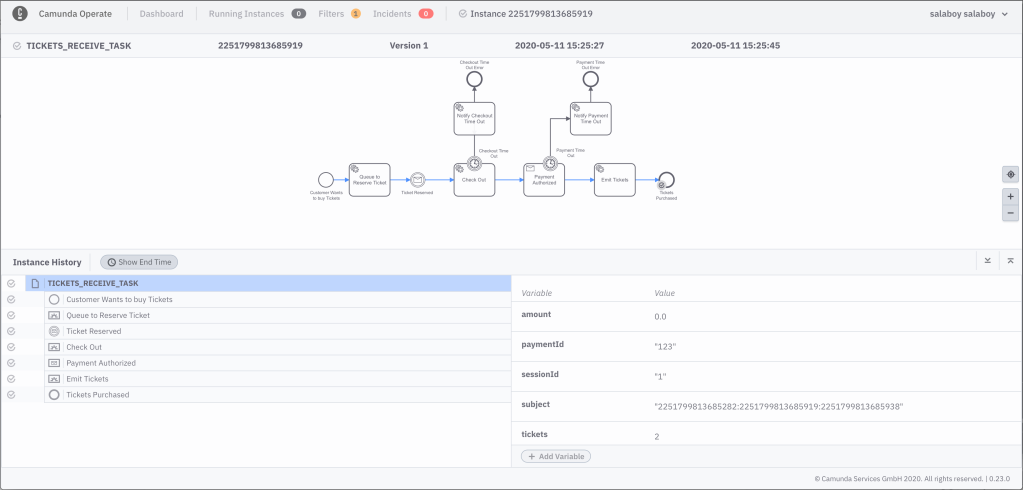
Notice that now, the execution of this workflow will be happening inside Camunda Cloud. This means that you can monitor these executions in the Camunda Operate hosted right beside your cluster:
Sum up
This blog post covers a basic example of how you can orchestrate Cloud Events using Zeebe Workflow. You saw how you can run all the components in your own Kubernetes Cluster as well as using Zeebe inside Camunda Cloud to avoid installing, running, and maintaining Zeebe in your infrastructure (one less thing to worry about!).
This example shows how you can leverage a Workflow Engine (like Zeebe) and the BPMN language to orchestrate Cloud Events to:
- Gain visibility and business traceability about how your services are interacting, where the bottle necks are and how to identify changes for continuous improvement.
- Have an orchestration layer for your Event Based systems. Having the right balance between orchestration and choreography is key to develop a robust system that can continuously evolve.
- Have a robust set of mechanisms to deal with exceptions and non-happy paths, such as time outs and business error handling.
- Make sure that events follow a natural order to fulfil a business objective, this is very useful to identify if the flow can be improved and to understand new business requirements.
There are other ways to run the example, for example using Docker Compose or even running the services outside of Kubernetes and locally on your laptop. Feel free to reach out (comment here or via twitter) if you have any questions about this.
On a future blog post, a more advanced example will be covered using Knative, Cloud Events, Kafka, and WebSockets.
Stay tuned!
